Homemade Generator
Once I have an idea in my head to make something, I just have to make it. Whether it works or not, is another matter. Take for instance this particular project, a homemade generator. It didn’t turn out quite the way I wanted it to, but I sure learned a lot along the way.
There’s this cool website called otherpower.com that features a bunch of projects focused on generating home-brewed electricity. Wind mills are a big thing for these people, and they give very detailed descriptions of how to build wind powered generators from scratch. This site is so cool and the descriptions so detailed, I decided to try constructing a generator myself!
When I was little, my Dad bought a motor kit for my brother and me to build. We build it and our Dad got it to work, though not as well as we had expected. The rotor would turn hesitantly and not very fast at that. Building this little generator from scratch reminded me of this childhood experience.

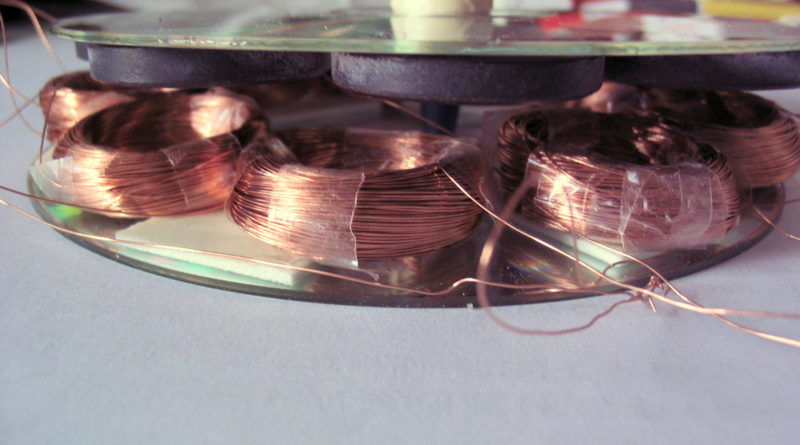
I started out making a winder to make the coils. Good thing I saved some old soybean milk cartons. They worked great as the framework for my coil winder. The milk carton held a spool of enamel wire and the spindle on which I wound the coil. Everything I used to build this little project, except for the enamel wire and magnets, was recycled or made from things I already had on hand.

After making a coil with approximtely 300 turns of wire, I took it off the spindle and used tape to hold it together. It took about one and half hours to make nine of these coils.

With coils in hand, I next stripped the enamel off the ends of the coils and then connected them in a particular way so that every third coil is in phase. There’s a man named Hugh Piggott who has lots of information about this if you want to find out more. Again, you can also go to the Other Power website for more info.

Next I made a rotor out of a CD disc and eight cheap magnets I bought at a stationary store. I should be using much more powerful magnets and a metal disc instead of a plastic CD, but I couldn’t scrounge up these particular items. According to what I read on the Web, you can get much better results with more powerful magnets and using a rotor made out of steel. Super glue works great to stick the magnets to the disc. I used a pen to spin the rotor.

With a completed rotor, I tested each set of coils to see if voltage was generated when the magnets passed over them. It turns out that I has some coils set the wrong way. Each set of coils need to have their windings in the same direction. If they were not in the same direction, there would be no voltage. This took me quite some time to get all three set of coils registering voltages on my multimeter.

After I was sure that all three sets of coils were OK, I strung them all together and hooked the set up to my multimeter and spun the rotor. The largest voltage I got was 0.019V. Probably not enough juice to disturb a cockroach. Very disappointing.
I wonder how much is due to my crummy wire connections. Perhaps if I soldered all the connections instead of just twisting them, I’d get generate more juice. Also, more powerful magnets and a steel rotor plate would probably boost performance. Since I haven’t yet found more powerful small magnets, this project will be on hold until I find some.